How To Add A Product To Amazon – The Perfect Guide
When you set up an Amazon seller central account, you will likely be prompted to add a product. If you already know how to add a product on Amazon this is great, simply go ahead and follow the prompts and you’ll be making progress in no time.
If you are slightly less tech-savvy, then this complete guide on how to put a product on Amazon is designed especially for you!
In this post, we are going to explain how to add a product to Amazon, the basic elements you need to include from an on-page optimisation point of view and why these are important when you are launching a product inside seller central.
If this seems like a lot to track & manage, we offer an effective and affordable Amazon management solution that can take care of it for you. We also offer reliable and low-cost product ranking solutions so you can forget worrying about how to add products to Amazon, sit back and watch your profits grow while the experts handle it for you!
Request a proposal now if this sounds good, but if you’d rather do it yourself, read on!
Whether you are launching a private label product or a product that other sellers stock, the technique of adding a product on Amazon is relatively similar. Despite this, there are a few key elements that are crucial to ensure you get right now, otherwise, they will just be a pain in the a** in the future!
Throughout this post, we are going to walk you through the exact process we use. Although, we will not be talking about keyword research which is an incredibly important aspect of listing a new product on Amazon. Click on that link if you need help with that! We highly recommend it.
This guide is instead a technical guide for beginners who have not added a product to Amazon before.
Step 1 – Login + Add
The first step is to log in to your Amazon seller central account. You will likely have the option in the top left of the page where it says Catalogue –> Add Products.
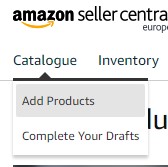
If for some reason you do not have this option inside the catalogue section, go to ‘Inventory‘ instead and hit ‘Add a Product‘ via the option there.
Scroll down until you see the “List a New Product” section.
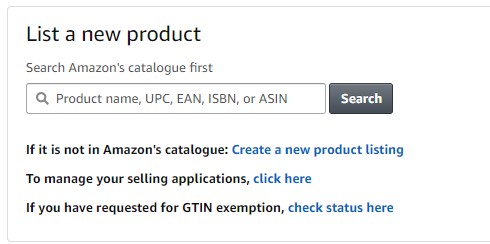
Here you have two options:
You can either search Amazon’s catalogue and find an existing product you are looking to sell.
This is super quick and helpful if you are looking to sell something that is already sold on Amazon.
If you are looking to learn how to list a new product on Amazon, especially under your own brand or anything with private label rights, however, then you need to click the “Create a New Product” listing.
This is what the majority of the people reading this blog will likely be doing and as a result, we are going to use this for our walkthrough example:
Step 2 – Create A New Listing
Next, you will be hit with a page asking you to classify your product.
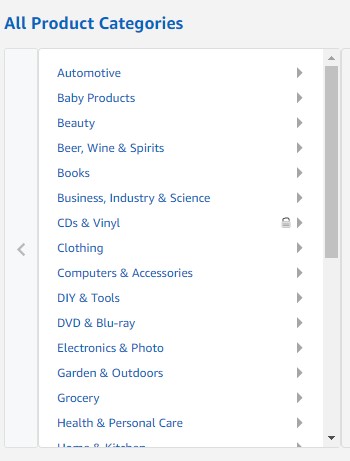
Choosing a category is pretty self-explanatory.
However, sometimes people are not quite sure which category to enter their product.
We have a little advice on this area from experience, so let us take you through step by step:
Your primary category should be fairly obvious. Let us take Garden and Outdoors in this example.
Next, we get to our subcategory options.
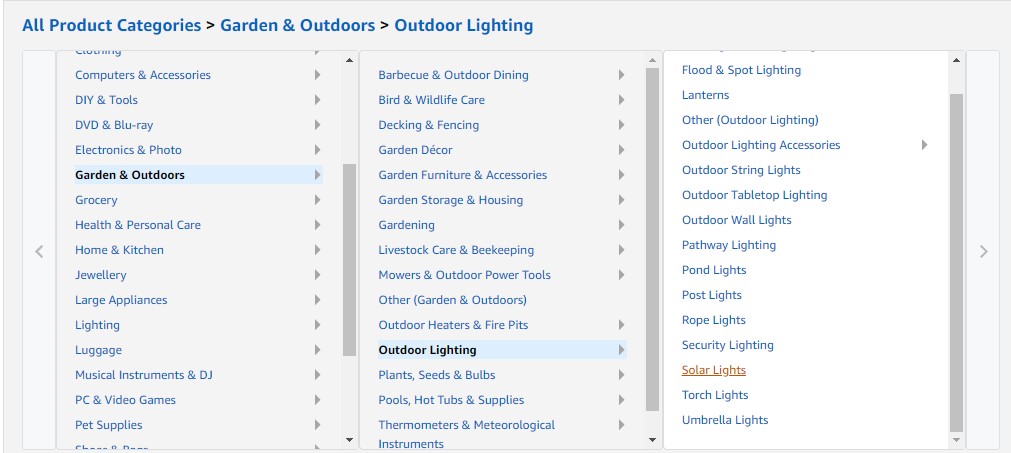
Again, even this should be relatively obvious for the majority of potential products.
BUT if it is not then, we have a little trick for you to try.
The trick depends on how much capital you have available to invest in your business.
If you have “unlimited” capital, or you are looking to earn the most revenue long term, then you should always enter into the category that generates the MOST sales or revenue.
But wait.
How do you find out which one that is?!
We use a tool called Junglescout.
This piece of software gives you all of the revenue estimates for the products that rank on page 1 for any category you choose.
All you need to do from here is:
- Go into this category in Amazon.com (or whichever country’s Amazon site you’re using).
- Click the Chrome add-on that JungleScout gives you when you purchase or signup.
- Enter the most generic keyword and search in the specific categories you are considering.
For this example, let us say that we are not sure which category to choose between Outdoor Lighting and Garden & Outdoors.
All we would do is select the product categories that are most relevant.
For instance, if we had lights designed for ponds, but they were also solar powered and we didn’t know whether to list in Pond Lights or in Solar Lights.
All we would do is search the word “lighting” in both Pond Lights and in Solar Lights and hit Junglescout for the results in both.
Actual results for Amazon.co.uk are below:
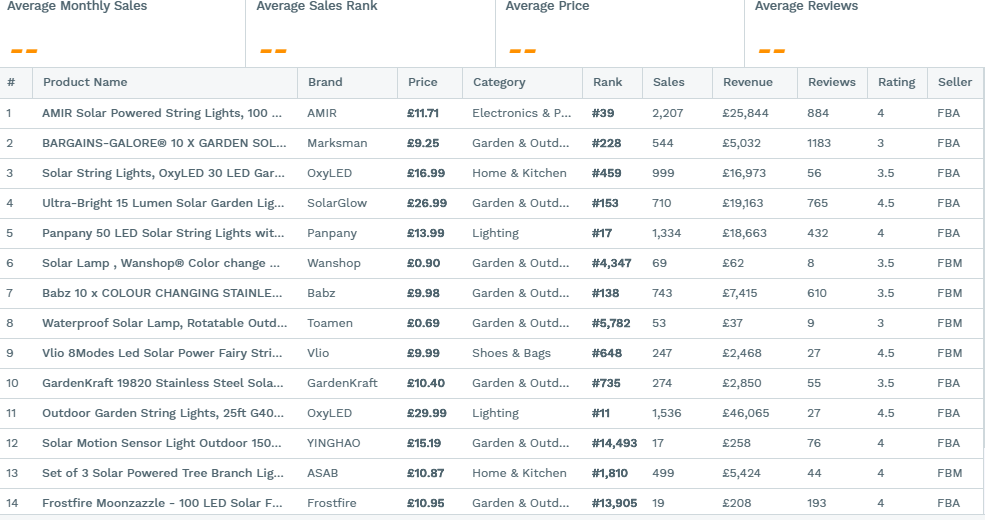
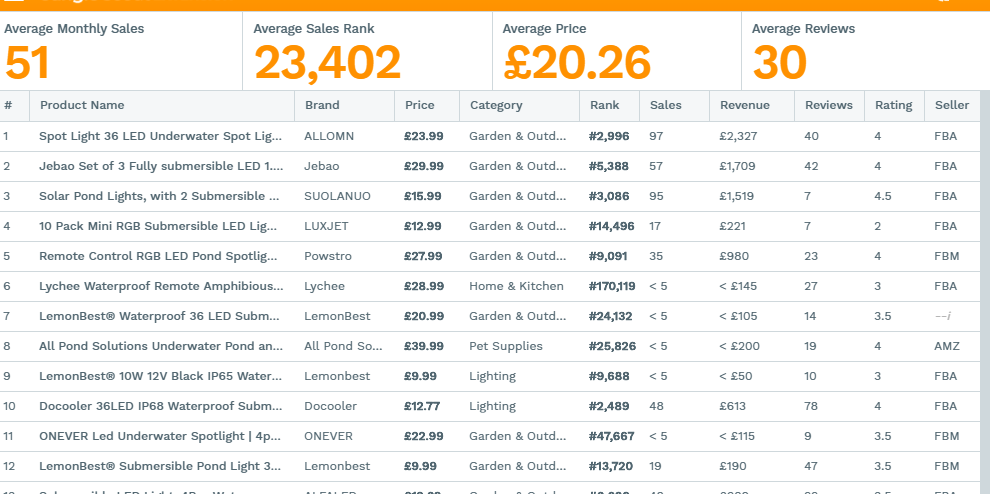
Even if you aren’t experienced with Junglescout, the numbers listed above should make it clear there is a massive difference in potential revenue for people looking to launch in Pond Lights when compared to Solar Lights.
If you do not have the budget to promote in a specific category, then we would recommend going for Pond Lights (meaning whichever one has the lesser competition out of your two options).
Here it would be a lot easier to rank because we are competing against less competitive products and companies. The top ranking competitors earn about £2,000-£3,000 per month – a much easier and quicker target to reach than the alternative.
On the other hand, if we wanted to expand quickly and had the money to invest, we would be better off investing heavily in the solar lights category. As a result of this, we would earn more once we managed to rank. The top ranking competitors in this category generate – £8,000-£10,000 a month in sales meaning we have more to gain. But of course, this equally tells us the category is more difficult to rank in.
It may seem simple, but this really is the best way to make a decision about which category to go into.
When you know your product category, your budget and the competition, you have the freedom and information to make smart decisions.
With that in mind, it’s usually fairly obvious what your best course of action is going to be just by looking at the two results in Junglescout.
Step 3 – Listing Vital Info & Offer
Now that we have selected our category option, we will arrive at the Listings Details page.
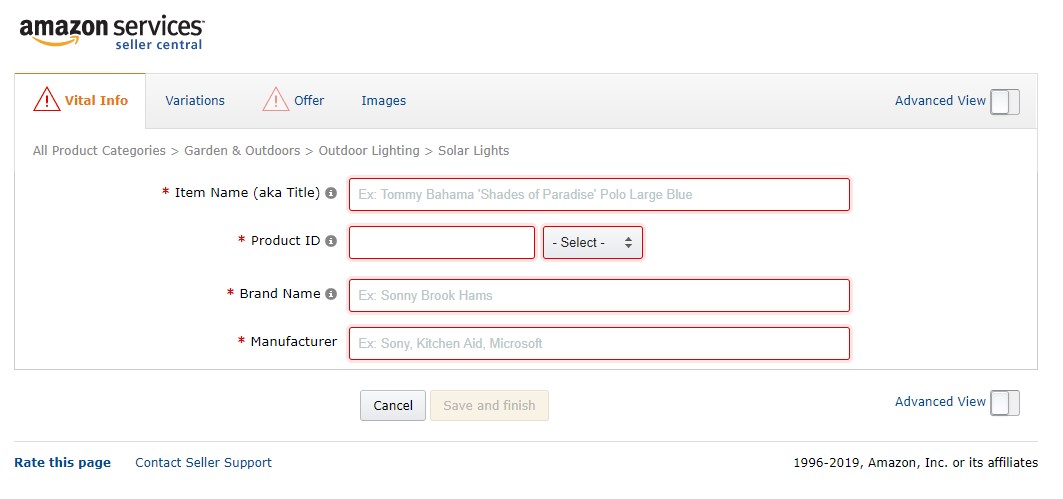
This is a relatively straight forward page in which we are looking to write a really engaging title, including your keywords and benefits.
It’s also necessary that you fill in the brand name and manufacturer tab. If you have built your own brand separate from the manufacturer, then you can just put the relevant information in this section.
You will also need a product ID number. We usually prefer to purchase a set of EAN numbers for this purpose, but you can create an ASIN if you prefer. You can get all the information you’ll need on this here.
The title is the only aspect you really need to focus on when you’re at this stage, as it can make a crucial difference to the performance of your products.
Most importantly, the title needs to include your primary keywords. If you have not read our product optimisation page yet, feel free to head over and check out the keyword research section, it’ll be extremely useful at this stage.
Once you have found your keywords, remember to input them into your title as this is the most effective on-page ranking element.
Once you have your title and other information, you can go to the next tab – “offer”.
You get the option to skip and add later, but we do not recommend doing this.
Condition will be new if it is a brand new product directly from the manufacturer. If it is anything else, then simply state accordingly.
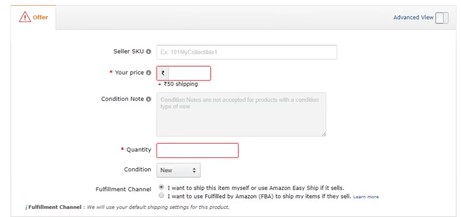
Price – Of course down to the product you are selling.
Finally an important tickbox. This essentially allows you to select whether you want Amazon to pack and deliver the items for you (Amazon FBA), or if you want to do it yourself (merchant fulfilled).
I always recommend starting out with FBA, as this does not tie you to a specific location or warehouse. But if you have a specific strategy, then integrate this. Just make sure you understand the decision you are selecting.
Step 4 – Images
Images are incredibly important.
You want to ensure you have benefit driven images, as well as nice clear product images.
Benefit-driven images show the product in use, with a small amount of text talking about why your product is awesome. We like to have 3-4 of these images and 1-3 of the product in action or just a general product photography shot.
Focusing on the benefits of the product is one of the most important things about this whole process, as it tells the customer why they should buy your product and not one of the competition.
Below is an example of this, although we do need to take this one a step further.
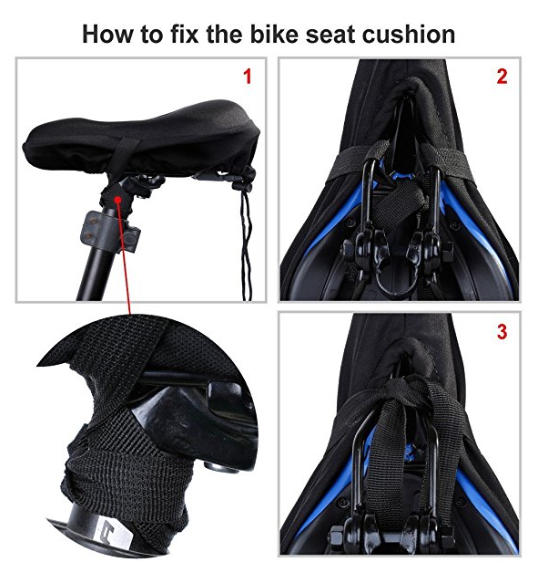
Having a look at a product in a non-lighting niche, we can see product feature driven images below. Although these sellers should pull each element out and actually have a specific image for each product benefit.
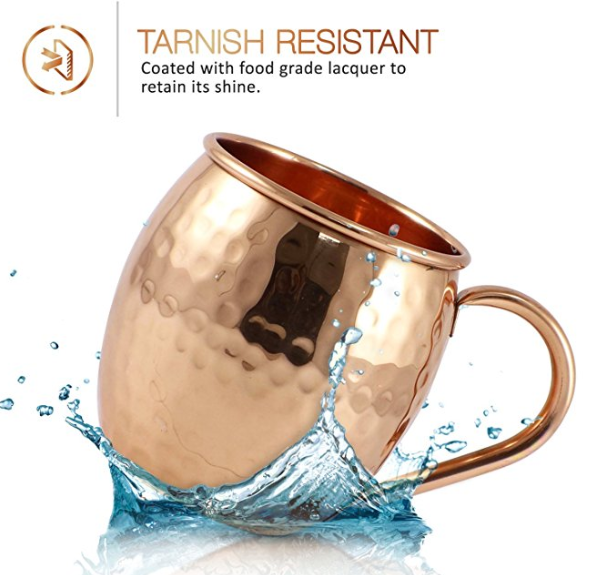
Once we have our product images, we are ready to go onto the next step.
Step 5 – Description & Bullet Points
This is what appears at the top of your listing (bullet points).
The description appears a lot further down and actually, 90% of Amazon buyers do not even read the description. As a result, we write this a bit differently to the bullet points.
The bullet points need to be written with PERSUASION as the focus.
We are objection handling in the bullet points and outlining why our product is 100% better than the competitors’.
We want to explain the key BENEFITS, not the features. For example, if we have a copper mug that is thicker. Who cares?
We want a copper mug that is thicker so it is stronger, lasts longer, can be used years from now. All at the very affordable price point of only XYZ dollars.
That is the difference between product features and product benefits.
A great idea is to put the benefit in CAPITAL LETTERS to draw attention to in, then follow with more information about that particular benefit or feature in lower case for those who want to read on.
You can even go deeper and talk about the benefits of those benefits, going into how this product will affect your customers’ lives and be the best thing they ever bought.
Description
With the description, you want to go into more detail on your keywords.
You know most people who scroll down this far are looking for more information, so the more you can fit here the better, as long as it remains easily readable and scannable as opposed to becoming a big word soup.
For example, if we have 20 types of drinks we can make in the copper mugs that people are searching in Amazon, why not get these drinks into the content? Each one is a possible chance to catch the attention of somebody who enjoys that drink and wants something a bit more special to enjoy it from.
To do that in the bullet points or title is going to be pretty much impossible and look a bit weird even if we do manage it.
Of course, at the stage of the bullet points, people are still just scanning and looking for basic features so keeping it concise here is crucial.
This is why you save further details for the description. You want to go into further detail about what makes your product a bit more unique here for those who are looking for extra information.
Things like how the product is manufactured, who you are and why they should buy from you can all help conversions here too.
Step 6 – Keywords
Keywords are probably the aspect we see done wrong the most often.
We are not sure why, as if you do your homework a little, it isn’t particularly hard to get them right.
Here you simply want to put the keywords (only one per line) that you are looking to rank for inside of Amazon.
NEVER LEAVE THESE BLANK!
This should be easy to fill out if you have done your keyword research correctly.
You want to take your product keywords that are most relevant to your product AND have the highest search volume.
But remember to try and avoid cross over.
For instance, if my top 3 keywords were: pond lighting, pond lighting for outside, best pond lighting
Putting those 3 keywords in 3 separate slots would be a waste since they are mostly the same.
Instead, we want to find keywords that are more distributed. This should be pretty easy if you have done your KW research correctly.
For example, our final 5 keywords should include pre and post words, aside from the broad “pond lighting” if that was our primary keyword.
It would look something like the below for our pond lighting example:
- outdoor pond lighting
- pond lights
- LED outdoor lighting
- waterproof lighting
- Underwater pond lights
This gives us some nice variation without going too broad.
This video will provide further tips on keyword research if you need them. If not, feel free to keep reading:
Rather have the experts handle this for you? Request a proposal now to see how we could boost your products and profits, or check out our case studies to see how we have leveraged Amazon marketing & SEO strategies to help over 100+ sellers earn more through Amazon!
We have spent more time and effort researching Amazon FBA success than anybody else, and have come up with a unique and original ranking strategy that can boost your organic sales for the foreseeable future!
Step 7 – More Details
Finally, we get to the More Details tab.
This is the last tab before your product goes live.
Honestly, the amount of potential data here is a little beyond the scope of the article, BUT that’s ok because you only need to put in what is relevant.
For example:
- Legal – Add anything that gives your product an edge legally or anything that you are required to put on a listing. “FDA approved” for example.
- Dimensions – If not mentioned in the product description, then put information about dimensions as people love these. However, if you’re selling a product where dimensions will be the most important information for potential buyers, for example, the length of cables – put that in the product name.
- Colours – Style differences including colours, variations and anything that people might want to know about the product.
- Required Elements – Amazon will require you to enter some specific elements in some categories. For instance, in our lighting example, it states the following as required: CAP type.
In this section, you should just carefully go through once and input any of the data you have about the product.
Once you have filled in all that information in, hit the SAVE AND FINISH button and your product will go live.
You only have to do this once and when it is done… your product is live!
That is all there is to it.
There is your basic introductory guide to launching a product.
Hopefully, you now have a much more full understanding of how to add a product on Amazon seller central.
Depending on if you have to be verified to sell in a category, or if you choose to list with FBA will affect the next step.
If you have chosen to use FBA, then you will need to send your inventory into Amazon’s warehouse.
Simply follow their prompted steps when you launch a new product and you will be ok, but we do have a guide on shipping to Amazon FBA if you need further help!
We post regular valuable and effective guides for getting the most out of Amazon, so make sure to keep checking back on a regular basis!
This entire process along with keyword research, PPC campaigns, initial sales and exploding sales is what we do at AmazonSEOConsultant.com – If you have any further questions regarding how to create a new listing on Amazon or need help pushing your products to the next level, please feel free to get in touch, or check out our process page to learn more!
